Right to Repair: Guide for Logitech G815 / G915 RGB Mechanical Gaming Keyboard

Introduction
After two years of faithful service my Logitech G915 recently had a defect in the left Ctrl switch and also the coating of the keycaps slowly disappeared at the edges. Electronics having defects after some time has passed is nothing new, however the fact that a switch is defective already after only two years of use is noteworthy. But it gets better.
No harm, I thought, I'll just let Logitech send me a replacement switch or send the keyboard to them for repair. Hah, what wishful thinking, I now know.
After going through several support agents I was made aware that Logitech doesn't produce exchange parts for the G915 anymore, if ever (let's remember really quick, my keyboard is only 2 years old and was released to market in August 2019). On top of that, Logitech doesn't even have locations for you to send the devices to for them to repair. They really expect you to just recycle your otherwise fully functioning device (in my case) and buy a new one (obviously at full price). Great for them, bad for you and your wallet.
And the most ridiculous thing about this whole affair is that Logitech has the audacity to publish a whole website collection about sustainability (see here), without caring at all about it. Why do I say that?
Let's back off a bit. The whole Right to Repair initiative is based on the structured lifecycle of Reduce - Reuse (- Repair) - Recycle. And by publishing the site collection mentioned above Logitech clearly communicates they outright skip all 2 (or 3, if you count Repair too) previous steps and go straight to Recycle, the last step in that very lifecycle. This is NOT ok!
Don't get me wrong, recycling is an important step in the lifecycle of a product but it is not the only step we can (and must, especially today) take. There is a good reason that Reduce, Reuse and Repair comes before Recycle, because only when following this lifecycle order exactly we can reduce the insane amounts of e-waste going to recycling facilities and landfills effectively.
On top of that, we can see another indication that Logitech does not care about the after-sales process of their products by writing an email to sustainability@logitech.com. What will happen? Nothing! I did just that, complaining about the bad practices they employ and requesting an explanation as to why they do it the way they do. I sent the email on the 18th of August, today is the 27th, no answer mail arrived in my inbox to this date. And I honestly do not expect one anymore at this point.
And to top it off Logitech even goes out of their way, in the name of achieving a prettier design, just like many other hardware manufacturers (Dell and Microsoft, I am looking at you), to make it difficult for the user to repair their device in a non-destructive way (out of the 19 (!) needed steps to open the G815 / G915, four are destructive).
[A/N: I will mark them in the list below with a {DESTRUCTIVE} label.]
So why go through all that trouble of setting up expensive programs and creating "pretty" websites about a topic they do not care about? To give the well-paying customer (because let's face it, Logitech products are not cheap) a good feeling while using a product from them of course (and make even more money in the process).
[A/N: Logitech had a fiscal year 2021 revenue result of $5.25 billion, just to put things in perspective.]
So to educate people about these predatorial practices and provide a way for betterment the rest of this article will describe the process of opening the G815 / G915 keyboard for repair, provide a high level example repair of a key switch and also the reverse order to close it again.
[A/N: You should be able to also follow this guide if you have a G915 TKL, so the wireless keyboard variant without the numpad, but be informed that count (and locations) of screws may differ.]
Prerequisites
You will need a Philips screwdriver with varying bit-sizes. The iFixit Mako Driver Kit contains every bit-size you will need. The Pro Tech Toolkit, also from iFixit, will make the whole process a bit easier since it contains additional tools to repair a device, like these keyboards.
Steps to Open
The steps to open the device are divided into Front and Back sections since both have to be touched.
A. Front
- Remove all keycaps from the switches
This works best by working from the left side of the keyboard to the right and trying to lift each key at its left side with your fingers and pulling up.
I will list the full order (on a QWERTZ layout) from top left to bottom right where each keycap is for orientation (" / " means that this key is directly next to the previous one, " // " will symbolize a small space between the keys; written symbols, so "Minus" for "-", means that the key is situated on the numpad; double height keys spanning two rows will only be mentioned once and in their first row; numpad buttons will be named assuming Num Lock is ON):
First row:
Esc // F1 / F2 / F3 / F4 // F5 / F6 / F7 / F8 // F9 / F10 / F11 / F12 //
Print Scrn / Scroll Lock / Pause Break
Second row:
G1 / ^ / 1 / 2 / 3 / 4 / 5 / 6 / 7 / 8 / 9 / 0 / ß / ´ / Backspace / Insert / Home / Page Up / Num Lock / Slash / Star / Minus
Third row:
G2 / Tab / Q / W / E / R / T / Z / U / I / O / P / Ü / + / Enter / Delete / End / Page Down / 7 / 8 / 9 / Plus
Fourth row:
G3 / Caps Lock / A / S / D / F / G / H / J / K / L / Ö / Ä / # / 4 / 5 / 6
Fifth row:
G4 / Left Shift / < / Y / X / C / V / B / N / M / , / . / - / Right Shift / Arrow Up / 1 / 2 / 3 / Enter
Sixth row:
G5 / Left Ctrl / Left Windows Key / Alt / Spacebar / Alt Gr / Right Windows Key / Context Menu Key / Right Ctrl / Arrow Left / Arrow Down / Arrow Right / 0 / Comma
Alternatively, you can only remove the keycaps covering the screws of the top panel, but I find it easier to remove all of them
(and clean them in the process ;) ). - Unscrew the 21 small black Philips head screws on the front
- Turn the keyboard around
We will continue on the back of the keyboard
B. Back
- Lift / Open the right kickstand / "keyboard foot"
- Unscrew the 6 immediately visible medium black Philips head screws
- {DESTRUCTIVE} Remove the top left thin and long rubber foot above the left kickstand / "keyboard foot"
- Unscrew the now newly visible 1 small black Philips head screw
- {DESTRUCTIVE} Remove the bottom middle thick and long rubber foot
- Unscrew the now newly visible 1 small black Philips head screw
- {DESTRUCTIVE} Peel the product label (with the LogitechG logo, model name, model number, serial number etc. on it) from the lightly elevated area in the top
[A/N: The G815 will not have this area with the product label elevated because there is no need for a battery compartment, but I still believe that screws will be hidden behind the label, so continue following the steps as if nothing happened.] - {DESTRUCTIVE} Peel the transparent foil underneath the label to gain access to another 2 screws in the bottom edges
- Unscrew these now newly visible 2 flat silver Philips head screws from the aforementioned edges
- With the panel now loose hold the keyboard key-side up in the air and you will see the panel hanging a bit on the edge where you removed the flat silver screws
- Pull down the panel to reveal the battery
- Put the keyboard down again and disconnect the battery from the keyboard by carefully pulling the plug from the socket on the mainboard
- Unscrew the now newly visible 2 black small Philips head screws on the topmost edge of the area below the now removed battery panel module
- Lift the bottom plastic cover by pulling the sides up to reveal the back of the mainboard
- Depending on the type of repair, unplug the plugs from the LogitechG RGB logo module (top right) and the volume control module (top left)
- The mainboard itself is screwed into the aluminum top with 5 flat silver Philips head screws, you can leave those in except when exchanging the whole board, then they will have to be unscrewed
To summarize, you will now have the following loose parts from the disassembly:
- 21 small black Philips head screws from the front cover
- 6 medium black Philips head screws from the back cover
- 2 small black Philips head screws from behind the rubber feet
- 2 flat silver Philips head screws from the battery panel cover
- 2 small black Philips head screws from below the battery panel
- One thin & long rubber foot from the back cover, top left
- One thick & long rubber foot from the back cover, bottom middle
- (Optional: 5 flat silver Philips head screws from the mainboard mounting holes)
Example: High Level Repair of a switch
Here I will give a short and high level description of how you can replace a switch.
1. Have the keyboard fully open following steps A1-3 & B1-14
2. Each switch is soldered to the mainboard with two solder points (silver), both of them are below the three small and one larger black dot forming an L on its side, belonging to each switch
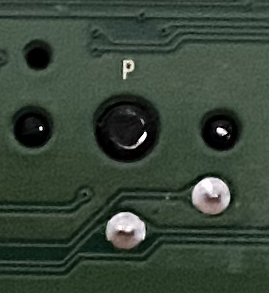
The different places of the switches are named, so the switch for the P key (see picture above) is seated in the structure (three small and one large black dot forming an L on its side & two solder points [silver]) from the front below the printed letter P on the board
3. Desolder the two solder points (silver) to loosen the switch
4. It can now be pulled out by hand from its place from the top side (keys up)
5. Push the exchange switch in and solder the two solder points to the mainboard
6. Proceed with closing the keyboard -> See Steps to Close
Steps to Close
To close the keyboard and prepare it for use again, follow the list of Steps to Open backwards, so from B16 to B1 and A3 to A1, but leave out B8 and B7 because the peeled foil and label can't be attached fully again, only using the glue still on them.
You don't pay any extra for the usage of these links.
Thank you for supporting the author and this blog!