RfC: Worry-free SSL certificates from Let's Encrypt with Certbot, Cloudflare DNS and Apache / NGINX

Introduction
After recently setting up another Ubuntu server with an Apache webserver I needed to look up the right syntax on how I can request a certificate from Let's Encrypt (LE in short), the awesome CA that offers anyone who asks free HTTPS certificates, by proving my domain ownership via Cloudflare DNS and also automatically installing the certificate and best practice settings into my webserver.
One can ask when such a complicated process would be necessary since Certbot, the official client for all certificate processes by LE, can just utilize an installed Apache / NGINX to prove the domain ownership. Yes, that's right, however not always is a permanently open Port 80 feasible, which Certbot, using the HTTP-01 challenge, needs to succeed.
In my case, I wanted a Checkmk monitoring server in my datacenter, it never has to be directly accessible from the internet (so no port forwarding of Port 80/443), only through LAN, but I like encrypting all my web traffic, if possible, even if it is just internal, so the server had to receive a trusted CA certificate.
And the easiest way to achieve this is by proving your domain to LE by the DNS-01 challenge instead, where, instead of Certbot temporarily posting a file to your webservers filesystem and reading that (HTTP-01 challenge), it creates a DNS record at your DNS provider which gets checked by the CA and then deleted again once the certificate is issued.
But why do I need to write this article when the Electronic Frontier Foundation (EFF in short) published this helpful site where you can look up any guide imaginable on how you can receive your LE cert with Certbot and DNS-01?
Easy, the specific guide on how to request your cert with Certbot, via DNS-01 with Cloudflare DNS and then also installing it automatically into Apache, contains an inaccuracy for a command which leads to absolute failure, and this inaccuracy has no obvious solution that someone without somewhat deep knowledge of the Certbot software can figure out by themselves.
So, without further ado, let's show you the correct way!
Content of RfC
Even though the official Certbot instructions mentioned above contain the error we want to correct here, we can use most of it, so pay close attention to the listed steps to know when to use which resource.
Steps to follow:
1. Go to https://certbot.eff.org/instructions?ws=apache&os=ubuntufocal and select the wildcard tab at the top:
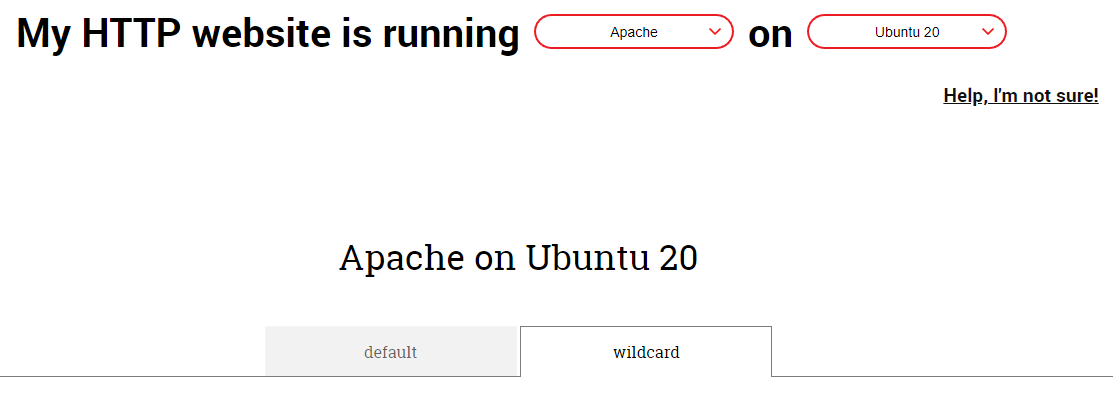
2. Now follow steps 2 to 8 (I explicitly skipped step 1 since I already know that Cloudflare is a supported DNS provider ;) ), like the site instructs you
3. At step 9, the correct command to run is sudo snap install certbot-dns-cloudflare, like the given example indicates
4. Follow step 10 from the site again, to generate and save your Cloudflare API token necessary to create and delete the evidence DNS record; the correct page for the instructions on how to do this is this one: https://certbot-dns-cloudflare.readthedocs.io/en/stable/#credentials
DO NOT use your Global API key, instead create a key specific to the zone(s) you need the certificate for.
After step 10 you should now have the file cloudflare.ini containing your token, looking like this
#Cloudflare API token used by Certbot
dns_cloudflare_api_token = yourtokenat the location ~/.secrets/certbot/ (so the full path to the file looks like this: ~/.secrets/certbot/cloudflare.ini).
5. Now comes the problematic section in the Certbot guide, because step 11, the decider on how to run Certbot, wants you, if you need to get AND install the certificate (which we want), to go the Examples section of your DNS plugin guide, pick a fitting command and just add -i apache at the end. And this will not work.
Why? Let's look at the examples given for the Cloudflare DNS plugin:
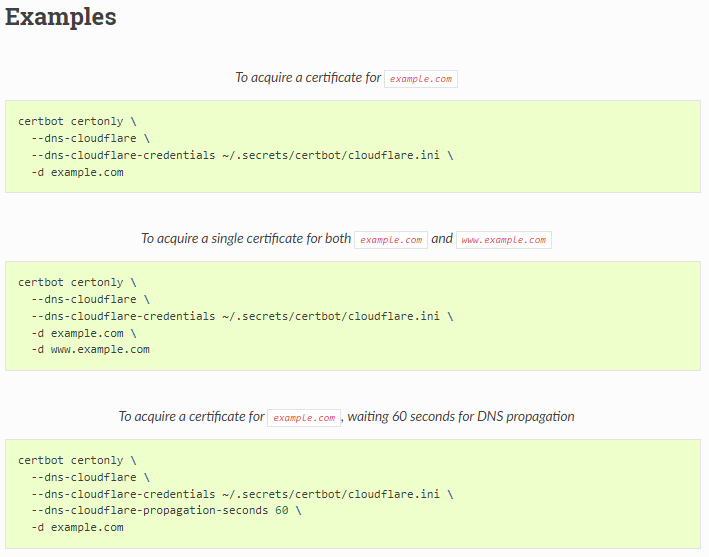
To clearly understand the inaccuracy, I will provide a WRONG command (the first example plus the mentioned -i apache), written like the instructions in step 11 want you to:
certbot certonly \
  --dns-cloudflare \
  --dns-cloudflare-credentials ~/.secrets/certbot/cloudflare.ini \
  -d example.com
  -i apache
What's the problem? All three commands use certbot certonly, which cannot work with -i apache, since certonly won't accept any authenticator [-a xyz] or installer [-i xyz] plugin parameters!
The correct command has to look like this:
- Apache
sudo certbot \
  -a dns-cloudflare \
  -i apache \
  --dns-cloudflare-credentials ~/.secrets/certbot/cloudflare.ini \
-d example.com- NGINX
sudo certbot \
  -a dns-cloudflare \
  -i nginx \
  --dns-cloudflare-credentials ~/.secrets/certbot/cloudflare.ini \
  -d example.com
You have to exchange example.com with your own domain you want the certificate for.
As you can see, I execute certbot without certonly, and with direct mentions of the authenticator [-a dns-cloudflare] and installer [-i apache or nginx, depending on the webserver installed]. That way, we enforce the use of the saved Cloudflare API token to automate the DNS record AND also successfully install the received certificate into the respective webserver configuration.
That's it. You should complete step 12 as a last measure to check if an automated renewal of your certificate will work, but you now have a webserver with correctly set up HTTPS.
Conclusion
Following this article we could see that a small but subtle difference in the certbot command can stand between you and true success.
If you should need additional assistance, the comment section of this article is always open for troubleshooting and discussion.
You don't pay any extra for the usage of these links.
Thank you for supporting the author and this blog!